Ships from our USA and CANADA stock — no extra duties or import fees for US and Canadian customers

Ships from our USA and CANADA stock — no extra duties or import fees for US and Canadian customers
1993-1995 Cadillac Eldorado
1993-1995 Cadillac Eldorado
IMPORTANT PLEASE READ CAREFULLY: - RISK OF AIR BAG DEPLOYMENT -
The installation of the PRO Module NEVER requires to work on AIR-BAG wires, but it might require to work close to them.
Before proceeding with these installation instructions, unplug the battery of your car and wait 20 minutes, with the battery unplugged, for any stored energy to be discharged.
Leave the battery disconnected during the entire installation until it's all installed, ready to be tested. Even with the battery disconnected, always make sure the wires you are working on are the correct ones. Never work on AIR-BAG wires with a tester, voltmeter or light or any other instrument that has a battery.
Option 1: Installation at PDM
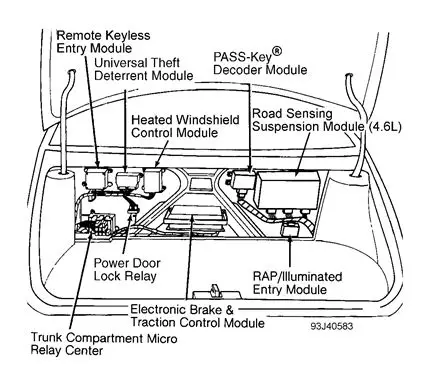
PDM Location and how to install the NEWROCKIES FULL Passkey Bypass
The Passkey Decoder module (PDM) is in the trunk.
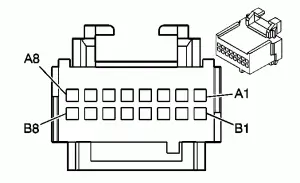
The Passkey decoder module Green Connector is as following:
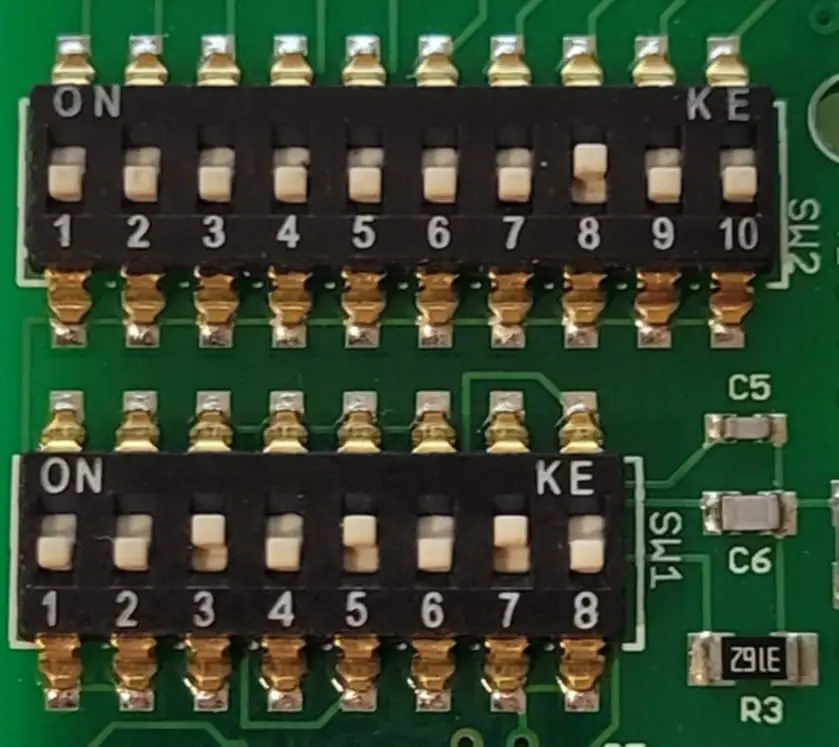
Set the PRO Module switches as in the photo here above
- Open the NEWROCKIES PRO Module's cover (this will NOT void the warranty) by removing the 2 screws on the bottom.
- Locate the 2 sets of switches.
- Change the switches configurations on both banks to match those of the photo.
- Close the enclosure tightening with the 2 screws.
NOTE: If the enclosure of your NEWROCKIES PRO Module is NOT green and blue, please contact us to request the correct configuration.
Connect as following:
PRO Module
CAR Wires
RED
Attach to the PINK or PPL/WHT at the PDM Connector Pin A2
WHT
Not Used
BLK
Attach to the BLACK with a WHITE stripe at the PDM connector Pin B5
PPL
Attach to the (YEL/BLK or BLK/YEL) at the PDM connector Pin A4
GRN
Attach to the DARK BLUE wire at the TDM connector Pin A3
YEL
Not Used
BRN
Not Used
NOTE: After installing the NEWROCKIES PRO Module, leave the PDM unplugged as it is not needed anymore
Option 2: Installation at PCM / ECM
Set the switches of the NEWROCKIES PRO Module as indicated for Option 1 PDM Installation.
Connect the black yellow to the black white wire at the PDM connector referring to the installation instructions in option 1. Confirm that the engine will crank. If so, then tape all the other connections up at the back, leave the factory PDM out unplugged (if present) and go to the PCM.
The computer (PCM) is located behind the passenger side of the dash. Remove the panel below the dash for access.
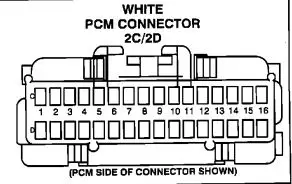
At the PCM connect as following:
- Splice the red wire of the PRO module into the Purple white wire at pin 2D5.
- Splice the black wire of the PRO module to the Black/white in pin 2D3
- Cut dark blue wire in pin 2C8 about 2 inches far from the connector, then connect the GRN of the PRO module to it on the side toward the PCM. Tape the other side.
Troubleshooting
In case your car is still not starting after installation of the PRO Full Bypass module, please check the following and perform the recommended actions before contacting our support team:
- Make sure connector’s pinout and wiring colors of your car are both matching exactly those of our instructions. If not, please Submit a Request to our support team with details of the pinout and wiring colors in your car.
- Is the light on the side of the PRO module turning on? If not check power between RED and BLK wires of the PRO module installed and with the key in the ON position (you can use a power-meter or a light) and Submit a Request to our support team with results of the measurement.
- If your instructions do NOT make use of the PPL wire of the PRO Module then skip this step, otherwise, if you use the PPL wire and points (1) and (2) above are correct and your car is not even cranking then make sure the PPL wire of the PRO bypass is connected correctly and the connection is tight. Also try shorting with a loose piece of wire the PPL and BLK of the PRO module.
- If car is still not cranking then Submit a Request to our technical support team detailing the tests you have done and the results.
- If the car is cranking, but engine doesn’t start or sometimes starts but immediately dies then do the following:
- If your instructions make use of the GRN wire of the PRO Module, then make sure the GRN wire of the PRO bypass is correctly connected and the connection is tight.
- Open the PRO module’s cover by removing the 2 screws on the bottom and change switches 7 and 8 of SW1 to [7:ON, 8:OFF] or to [7:OFF, 8:ON]. Make sure the switches 1-6 of SW1 are exactly as indicated in the instructions for your car model/year and if not, then change them accordingly. Try starting the car.
If car is still not starting or if you have any questions or concerns please Submit a Request to our technical support team detailing the tests you have done and the results.
NOTE: when contacting our support team, please always indicate your car’s make, model and year.
Is the GM Security System (VATS, Passkey or Passlock) giving you problems?
Would you like to solve the problem permanently?
You are in the right place!
NEWROCKIES is #1 in the world. It was born to solve GM VATS System problems once and for all and it's the only thing we do. Our PRO Module is a FULL VATS Bypass that gets rid of the system entirely, the Key part, the Lock part and the TDM.
- <<NEWROCKIES started it ALL>>
- <<The Untold Story Behind GM Security Systems>>
- <<Buy the NEWROCKIES PRO Module>> and finally drive with complete peace of mind.