2005-2006 Chevrolet Equinox

2005-2006 Chevrolet Equinox

IMPORTANT PLEASE READ CAREFULLY: – RISK OF AIR BAG DEPLOYMENT –

The installation of the PRO Module NEVER requires to work on AIR-BAG wires, but it might require to work close to them. 
Before proceeding with these installation instructions, unplug the battery of your car and wait 20 minutes, with the battery unplugged, for any stored energy to be discharged. 

Leave the battery disconnected during the entire installation until it’s all installed, ready to be tested. Even with the battery disconnected, always make sure the wires you are working on are the correct ones. Never work on AIR-BAG wires with a tester, voltmeter or light or any other instrument that has a battery.

The factory security functions are managed by the Body Control Module (BCM) where we need to make the connections. The BCM is located by the radio. Some times the radio will need remove but most odf the time you can work without doing so.

2005-2006 Chevrolet Equinox BCM Location 1
2005-2006 Chevrolet Equinox BCM Location 2
2005-2006 Chevrolet Equinox BCM Location 3

Once you remove the trim panel you will be able to unplug the bcm to make the connections that are required.

2005-2006 Chevrolet Equinox BCM Connectors

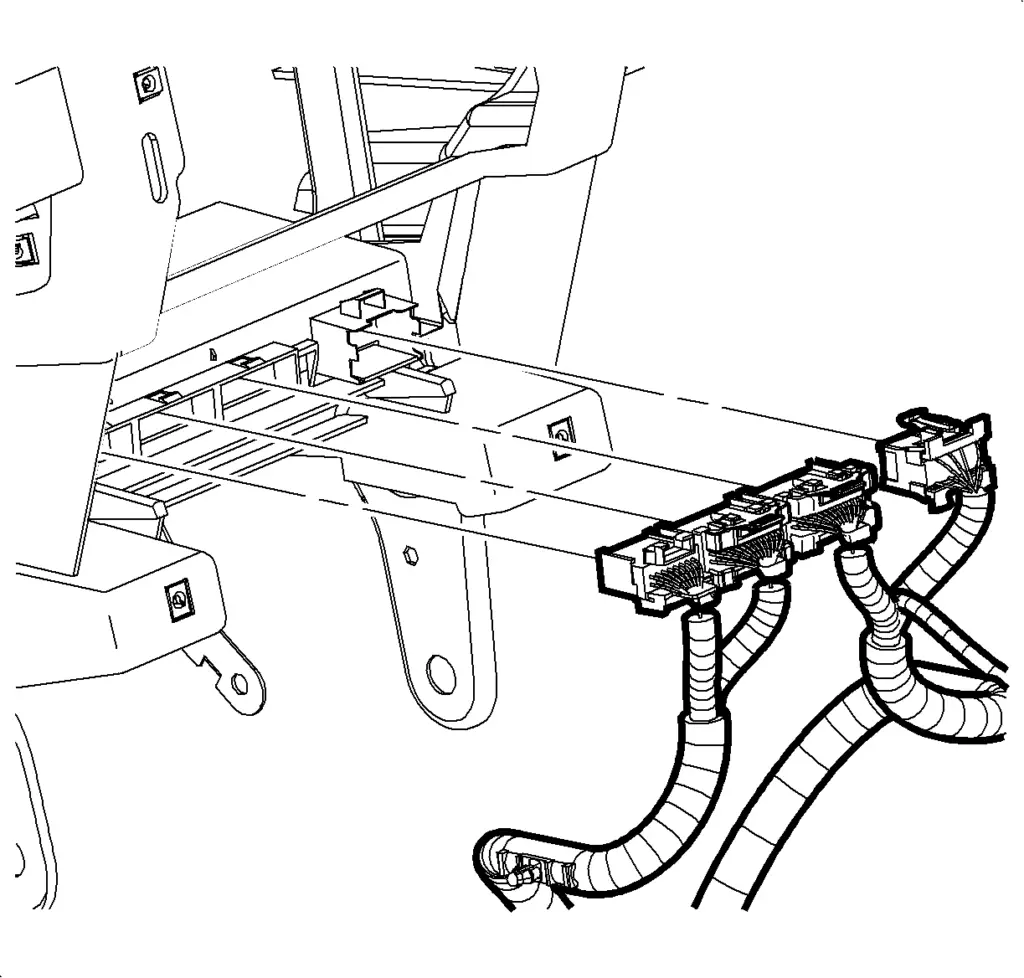
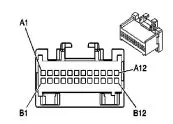
There are 4 connectors

2005-2006 Chevrolet Equinox BCM Connector C1 Gray

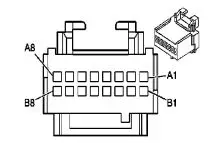
This is C1, 16 pin Grey

2005-2006 Chevrolet Equinox BCM Connector C2 Gray

This is C2, 24 pin Grey

2005-2006 Chevrolet Equinox BCM Connector C3 Pink

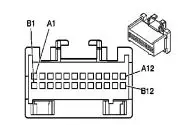
This is C3, 24 pin Pink

2005-2006 Chevrolet Equinox BCM Connector C4 Gray

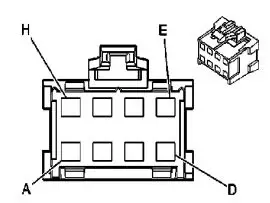
This is C4, 8 Pin Grey.

If the enclosure of your NEWROCKIES PRO Module is green and blue, please setup the switches as following (if enclosure is black, please submit a request to our support team for correct switch configurations):

Open the NEWROCKIES PRO Module’s cover (this will NOT void the warranty) by removing the 2 screws on the bottom. Inside there are 2 sets of switches.

Set the switches as in the photo here below:

Passlock

Connect as following:

PRO Module
CAR Wires
RED
Splice together with WHT of the PRO Module into the Pink wire going into BCM connector C2, Pin A7
WHT
Splice together with RED of the PRO Module into the Pink wire going into BCM connector C2, Pin A7
BLK
Splice it into the Black/white wire going into BCM connector C4, Pin G
PPL
Not Used
GRN
Not Used
YEL
Cut the Yellow wire in BCM connector C1, Pin A8 and attach the yellow from the pro module going into the BCM side of the cut and tape the other end to the vehicle up.
BRN
Splice it into the Orange/Black wire going into the BCM connector C1, Pin B8 *** MAKE SURE YOU USE THIS AND NOT THE OTHER ORANGE BLACK OR THE SYSTEM WILL NOT WORK***
Reconnect the BCM

Troubleshooting

  1. If your installation instructions make use of the YEL wire of the PRO Module, then make sure you plugged back all factory units (BCM, EVO, etc.) after installing the PRO Module.
  2. Make sure connector’s pinout and wiring colors of your car are both matching exactly those of our instructions. If not, please Submit a Request to our support team with details of the pinout and wiring colors in your car.
  3. Is the light on the side of the PRO module turning on? If not check power between RED and BLK wires of the PRO module installed and with the key in the ON position (you can use a power-meter or a light) and Submit a Request to our support team with results of the measurement.​
  4. If (1), (2) and (3) are correct, is your vehicle cranking at all? Some systems are disabled due to the nature of the Passlock system and the specifics of the year. If your vehicle is not cranking, see if the starter relay (often in the under hood fuse block) clicks with the key turned to crank. You will need a second person to turn the key to crank while holding your finger on the starter relay.
  5. After you perform this test, or if you need our help to find the starter relay in your car, please Submit a Request to our technical support team detailing the tests you have done and the results.
  6. If the car is cranking, but engine doesn’t start or sometimes starts but immediately dies then do the following:
    1. Make sure the YELLOW wire of the PRO bypass is correctly connected and the connection is tight, and that you cut only the wire or wires indicated in the instructions, and on the proper side of the splice.
    2. Open the cover of the PRO Module and make sure the switches SW1 and SW2 are set exactly as indicated in the instructions for your car model/year, otherwise change them accordingly. Try starting the car.
  7. If during the relearn the battery went dead, or you turned the key off too soon, do the following.
    1. Take the battery cables off the battery, hold the ends together for 10 seconds then attach them to the battery.
    2. Try the relearn again with a charger or booster attached so the battery doesn’t run down. Be sure to cycle the key fully to start each time, then only release it to run and wait the time indicated.
    3. Also be sure the key was turned off for more than 30 seconds afterwards.

If car is still not starting or if you have any questions or concerns please Submit a Request to our technical support team detailing the tests you have done and the results.


NOTE: when contacting our support team, please always indicate your car’s make, model and year.

Is the GM Security System (VATS, Passkey or Passlock) giving you problems?

Would you like to solve the problem permanently...

You are in the right place!

NEWROCKIES is #1 in the world. It was born to solve GM VATS System problems once and for all and it’s the only thing we do. Our PRO Module is a FULL VATS Bypass that gets rid of the system entirely, the Key part, the Lock part and the TDM (which is the brain of the system).