2003-2007 Saturn Ion

2003-2007 Saturn Ion

IMPORTANT PLEASE READ CAREFULLY: – RISK OF AIR BAG DEPLOYMENT –

The installation of the PRO Module NEVER requires to work on AIR-BAG wires, but it might require to work close to them. 
Before proceeding with these installation instructions, unplug the battery of your car and wait 20 minutes, with the battery unplugged, for any stored energy to be discharged. 

Leave the battery disconnected during the entire installation until it’s all installed, ready to be tested. Even with the battery disconnected, always make sure the wires you are working on are the correct ones. Never work on AIR-BAG wires with a tester, voltmeter or light or any other instrument that has a battery.

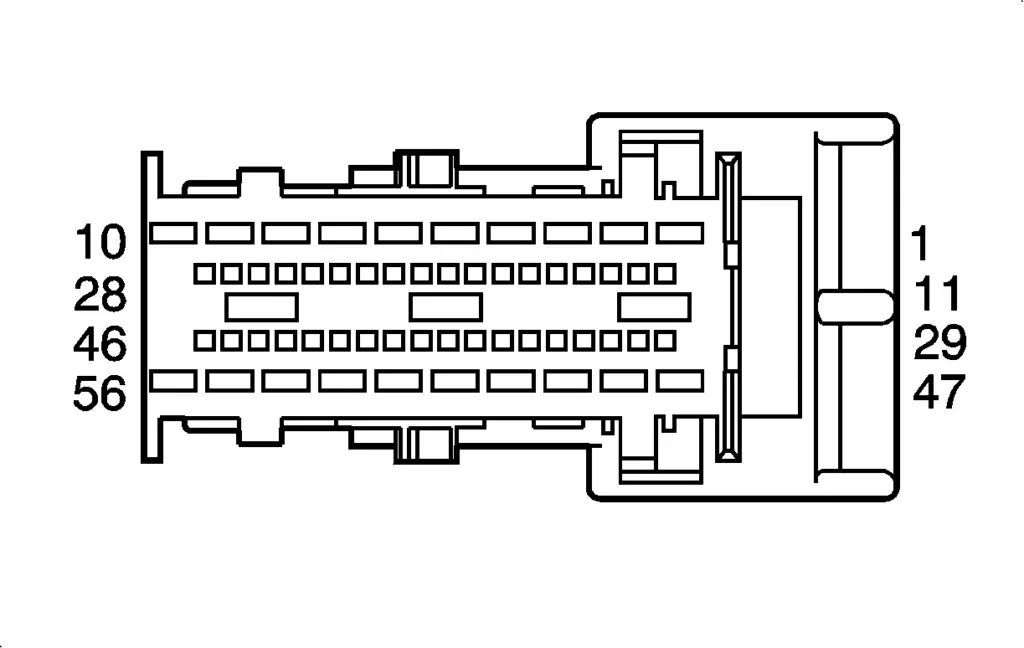
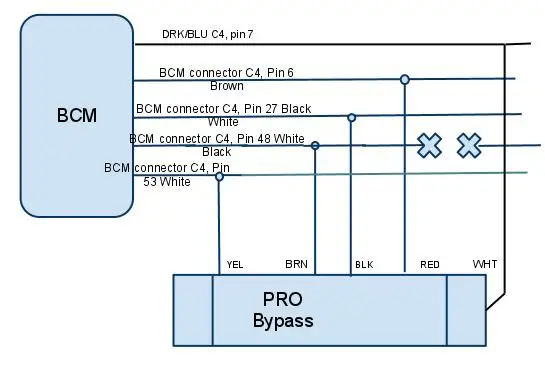
The Connections are all made on a single connector at the Body Control Module,

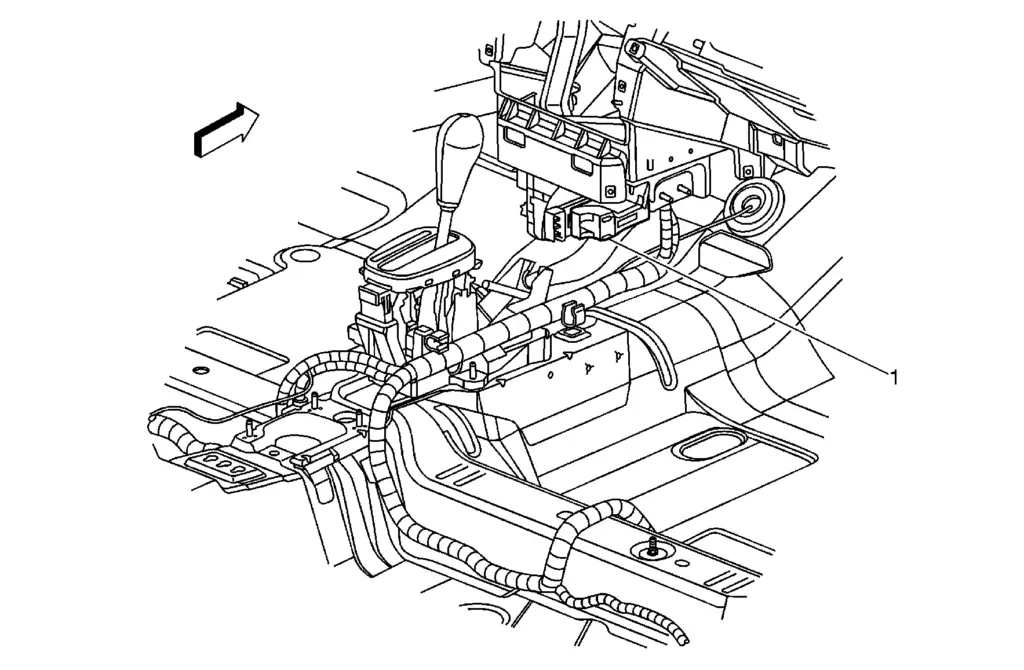
The BCM is in the center console, in front of the shifter on the lower side of the dash.

2003-2007 Saturn Ion BCM Location 1

Remove the trim.

Apply the park brake.

If equipped with an automatic or VTi transmission, shift the transmission into neutral.

2003-2007 Saturn Ion BCM Location 2

If equipped with an automatic or VTi transmission, remove the console shift lever bezel by carefully lifting up around the outside edge.

2003-2007 Saturn Ion BCM Location 3

If equipped with a manual transmission, unsnap the shift boot from the front console cupholder.

2003-2007 Saturn Ion BCM Location 4

Lift the front console cupholder to disengage the retaining fasteners.

Disconnect the cigar lighter electrical connector.

2003-2007 Saturn Ion BCM Location 5

Remove the front console cupholder. If equipped with a manual transmission, slide the shift boot through the front console cupholder.

2003-2007 Saturn Ion BCM Location 6

Remove the left console side extension retainer. Turn the retainer counterclockwise to remove.

Remove the right console side extension retainer. Turn the retainer counterclockwise to remove.

2003-2007 Saturn Ion BCM Location 7

Remove the left console side extension by pulling the console side extension rearward to disengage from the console.

Remove the right console side extension by pulling the console side extension rearward to disengage from the console.

2003-2007 Saturn Ion BCM Location 8

Remove the console center extension screws.

Pull out on the console center extension to disengage the retaining fasteners and remove the extension.

2003-2007 Saturn Ion BCM Location 9

Unsnap the park brake boot from the console.

2003-2007 Saturn Ion BCM Location 10

If equipped with an armrest assembly, remove the console compartment screws.

Lift up on the rear of the console compartment to release the retaining fasteners.

Lift the console compartment and push the park brake boot through the opening in the compartment.

Slide the console compartment over the park brake lever.

2003-2007 Saturn Ion BCM Location 11

Disconnect the rear power outlet electrical connector.

2003-2007 Saturn Ion BCM Location 12

Remove the front and rear console screws.

Lift the console over the park brake lever and the shift lever.

Bottom view.

2003-2007 Saturn Ion BCM Connectors C3 and C4 Bottom view

All the connections are at the Gray connector C4.

2003-2007 Saturn Ion BCM Connector C4 Gray

If the enclosure of your NEWROCKIES PRO Module is green and blue, please setup the switches as following (if enclosure is black, please submit a request to our support team for correct switch configurations):

Open the NEWROCKIES PRO Module’s cover (this will NOT void the warranty) by removing the 2 screws on the bottom. Inside there are 2 sets of switches.

Set the switches as in the photo here below:

Passlock 323

Connect as following:

PRO Module
CAR Wires
RED
Splice into BROWN wire at the BCM Connector C4 Pin 6
WHT
splice to DRK/BLUE wire at connector C4 Pin 7
BLK
Splice into BLACK with WHITE stripe wire at the BCM connector C4 Pin 27
PPL
Not Used
GRN
Not Used
YEL
Splice with the WHITE wire at BCM connector C4 pin 53
BRN
Cut WHITE with BLACK stripe wire at the BCM connector C4 Pin 48 a couple inches from connector so you have room to connect the brown wire to the wire coming from the connector
Reconnect the BCM after installation

Relearn Procedure

  1. Turn the key on, with the engine OFF.
  2. Try to start the engine, then release the key to ON, Engine will not start.
  3. Watch the security telltale, after about 10 minutes, it will turn OFF.
  4. Turn OFF the ignition, and wait 5 seconds.
  5. Repeat steps 1 through 4 two more times for a total of 3 cycles/30 minutes. The vehicle is now ready to relearn The Passlock Sensor Data Code and/or Passwords on the next ignition switch transition from OFF to CRANK. You must turn the ignition OFF for 30 seconds before attempting to start the vehicle after the 3 cycles.
  6. Start the engine .

Troubleshooting

  1. If your installation instructions make use of the YEL wire of the PRO Module, then make sure you plugged back all factory units (BCM, EVO, etc.) after installing the PRO Module.
  2. Make sure connector’s pinout and wiring colors of your car are both matching exactly those of our instructions. If not, please Submit a Request to our support team with details of the pinout and wiring colors in your car.
  3. Is the light on the side of the PRO module turning on? If not check power between RED and BLK wires of the PRO module installed and with the key in the ON position (you can use a power-meter or a light) and Submit a Request to our support team with results of the measurement.​
  4. If (1), (2) and (3) are correct, is your vehicle cranking at all? Some systems are disabled due to the nature of the Passlock system and the specifics of the year. If your vehicle is not cranking, see if the starter relay (often in the under hood fuse block) clicks with the key turned to crank. You will need a second person to turn the key to crank while holding your finger on the starter relay. After you perform this test, or if you need our help to find the starter relay in your car, please Submit a Request to our technical support team detailing the tests you have done and the results.
  5. If the car is cranking, but engine doesn’t start or sometimes starts but immediately dies then do the following:
    1. Make sure the YELLOW wire of the PRO bypass is correctly connected and the connection is tight, and that you cut only the wire or wires indicated in the instructions, and on the proper side of the splice.
    2. Open the cover of the PRO Module and make sure the switches in SW1 are set exactly as per instructions for your car model/year, otherwise change them accordingly. Try start the car.
  6. If during the relearn the battery went dead, or you turned the key off too soon, do the following.
    1. Take the battery cables off the battery, hold the ends together for 10 seconds then attach them to the battery.
    2. Try the relearn again with a charger or booster attached so the battery doesn’t run down. Be sure to cycle the key fully to start each time, then only release it to run and wait the time indicated.
    3. Also be sure the key was turned off for more than 30 seconds afterwards.

If car is still not starting or if you have any questions or concerns please Submit a Request to our technical support team detailing the tests you have done and the results.


NOTE: when contacting our support team, please always indicate your car’s make, model and year.

Is the GM Security System (VATS, Passkey or Passlock) giving you problems?

Would you like to solve the problem permanently...

You are in the right place!

NEWROCKIES is #1 in the world. It was born to solve GM VATS System problems once and for all and it’s the only thing we do. Our PRO Module is a FULL VATS Bypass that gets rid of the system entirely, the Key part, the Lock part and the TDM (which is the brain of the system).