1993-1998 Oldsmobile Cutlass Supreme, Chevrolet Lumina, Monte Carlo 1994-1996 Pontiac Grand Prix 1995-1996 Buick Regal

1993-1998 Oldsmobile Cutlass Supreme
1993-1998 Chevrolet Lumina
1993-1998 Monte Carlo
1994-1996 Pontiac Grand Prix
1995-1996 Buick Regal

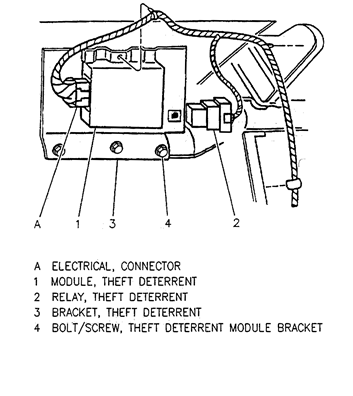
The TDM is under the right side of the dash (passenger side, behind glove box). It is up in there, backwards on a bracket.

Remove the Glove Box, Then remove the Bolts that hold the Theft deterrent module bracket from the cross car beam, then remove the electrical connector and the module.

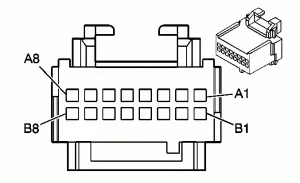
*****The Theft module has a GREEN Connector with 16 pins, 2 rows of 8 and is the only connector in the module.

1993-1998 Olds Cutlass Supreme TDM Location
1993-1998 Olds Cutlass Supreme TDM Connector

If the enclosure of your NEWROCKIES PRO Module is green and blue, please setup the switches as following (if enclosure is black, please submit a request to our support team for correct switch configurations):

Open the NEWROCKIES PRO Module’s cover (this will NOT void the warranty) by removing the 2 screws on the bottom. Inside there are 2 sets of switches.

Set the switches as in the photo here below:

PassKEY 2

Connect as following:

PRO Module
CAR Wires
RED
Attach to the PINK wire at the connector A2
WHT
Not Used
BLK
Attach to the BLACK wire at the conenctor B5
PPL
Attach to the YELLOW with a BLACK stripe at the Connector A4
GRN
Attach to the DARK BLUE wire at the connector A3
YEL
Not Used
BRN
Not Used
NOTE: After installing the NEWROCKIES PRO Module, leave the TDM unplugged as it is not needed anymore

Troubleshooting

  1. Make sure connector’s pinout and wiring colors of your car are both matching exactly those of our instructions. If not, please Submit a Request to our support team with details of the pinout and wiring colors in your car.
  2. Is the light on the side of the PRO module turning on? If not check power between RED and BLK wires of the PRO module installed and with the key in the ON position (you can use a power-meter or a light) and Submit a Request to our support team with results of the measurement.​
  3. If your instructions do NOT make use of the PPL wire of the PRO Module then skip this step, otherwise, if you use the PPL wire and points (1) and (2) above are correct and your car is not even cranking then make sure the PPL wire of the PRO bypass is connected correctly and the connection is tight. Also try shorting with a loose piece of wire the PPL and BLK of the PRO module.  
  4. If car is still not cranking then Submit a Request to our technical support team detailing the tests you have done and the results.
  5. If the car is cranking, but engine doesn’t start or sometimes starts but immediately dies then do the following:
    1. If your instructions make use of the GRN wire of the PRO Module, then make sure the GRN wire of the PRO bypass is correctly connected and the connection is tight.
    2. Open the PRO module’s cover by removing the 2 screws on the bottom and change switches 7 and 8 of SW1 to [7:ON, 8:OFF] or to [7:OFF, 8:ON]. Make sure the switches 1-6 of SW1 are exactly as indicated in the instructions for your car model/year and if not, then change them accordingly. Try starting the car.​

If car is still not starting or if you have any questions or concerns please Submit a Request to our technical support team detailing the tests you have done and the results.


NOTE: when contacting our support team, please always indicate your car’s make, model and year.

Is the GM Security System (VATS, Passkey or Passlock) giving you problems?

Would you like to solve the problem permanently...

You are in the right place!

NEWROCKIES is #1 in the world. It was born to solve GM VATS System problems once and for all and it’s the only thing we do. Our PRO Module is a FULL VATS Bypass that gets rid of the system entirely, the Key part, the Lock part and the TDM (which is the brain of the system).