1992-1996 Chevrolet Corvette

1992-1996 Chevrolet Corvette

IMPORTANT PLEASE READ CAREFULLY: – RISK OF AIR BAG DEPLOYMENT –

The installation of the PRO Module NEVER requires to work on AIR-BAG wires, but it might require to work close to them. 
Before proceeding with these installation instructions, unplug the battery of your car and wait 20 minutes, with the battery unplugged, for any stored energy to be discharged. 

Leave the battery disconnected during the entire installation until it’s all installed, ready to be tested. Even with the battery disconnected, always make sure the wires you are working on are the correct ones. Never work on AIR-BAG wires with a tester, voltmeter or light or any other instrument that has a battery.

The CCM is the module that manages the security and can be found behind the center of the Instrument Panel Cluster.

1992-1996 Chevrolet Corvette CCM Location

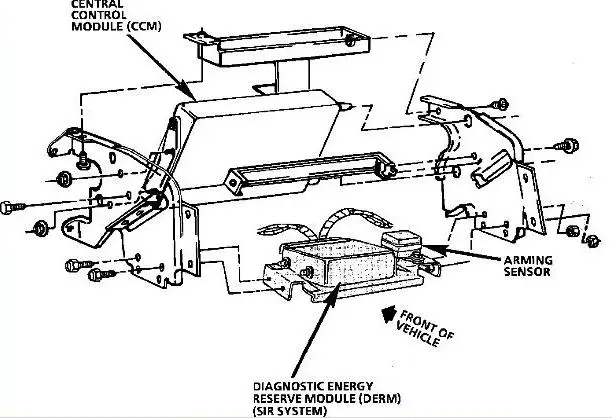
Disconnect harness connectors from the CCM.

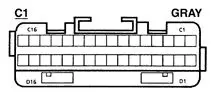
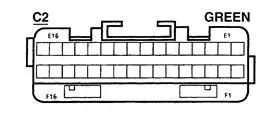
On the CCM there are 2 connectors (C1, C2).

1992-1996 Chevrolet Corvette CCM Connector C1 Gray
1992-1996 Chevrolet Corvette CCM Connector C1 Green

If the enclosure of your NEWROCKIES PRO Module is green and blue, please setup the switches as following (if enclosure is black, please submit a request to our support team for correct switch configurations):

Open the NEWROCKIES PRO Module’s cover (this will NOT void the warranty) by removing the 2 screws on the bottom. Inside there are 2 sets of switches.

Set the switches as in the photo here below:

Hybrid

Connect as following:

PRO Module
CAR Wires
RED
(Together with PRO Module WHT wire) Make a 3 wire splice to the CCM Connector C2, Pin E5 (or C5), PNK or WHT/BLK
WHT
(Together with PRO Module RED wire) Make a 3 wire splice to the CCM Connector C2, Pin E5 (or C5), PNK or WHT/BLK
BLK
Splice to Connector C2, pin E16 (or C16), BLK/WHT
PPL
Not Used
GRN
Not Used
YEL
Cut the WHT/BLK in Connector C2, Pin E12 (or C12) a couple inches far from the connector and connect the YEL wire of the PRO Module to it toward the CCM. Tape the other side.
BRN
Splice to the PPL/WHT in Connector C2, Pin F5 (or D5)
NOTE 1: Sometimes the rows on connector C2 are called C,D instead of E,F.
NOTE 2: Always plug the CCM back in after installation.

If your car is still not starting...

  1. Set SW2 (10 switches) as indicated in the second row of the table below.
  2. Try to start the engine. If engine starts then replace the cover on the PRO Module, the installation is completed. Otherwise if the engine still doesn’t start, turn off the key and remove it from the tumbler, wait 4 minutes and then continue with step #3 here below.
  3. Repeat step #2 above, but with SW2 as in row 3 of the table, then if still doesn’t start repeat again with SW2 as in row 4 of the table and so on until the right code is found and the engine will start.
1992-1996 Chevrolet Corvette NEWROCKIES VATS Bypass Switches

Troubleshooting

  1. If your installation instructions make use of the YEL wire of the PRO Module, then make sure you plugged back all factory units (BCM, EVO, etc.) after installing the PRO Module.
  2. Make sure connector’s pinout and wiring colors of your car are both matching exactly those of our instructions. If not, please Submit a Request to our support team with details of the pinout and wiring colors in your car.
  3. Is the light on the side of the PRO module turning on? If not, check power between RED and BLK wires of the PRO module installed and with the key in the ON position (you can use a power-meter or a light) and Submit a Request to our support team with results of the measurement.​
  4. If your instructions do NOT make use of the PPL wire of the PRO Module then skip this step, otherwise, if you use the PPL wire and points (1), (2) and (3) above are correct and your car is not even cranking then make sure the PPL wire of the PRO bypass is connected correctly and the connection is tight. Also try shorting with a loose piece of wire the PPL and BLK of the PRO module and see if it still doesn’t crank.
  5. If car is still not cranking then Submit a Request to our technical support team detailing the tests you have done and the results.
  6. If the car is cranking, but engine doesn’t start or sometimes starts but immediately dies then do the following:
    1. If your instructions make use of the GRN wire of the PRO Module, then make sure the GRN wire of the PRO bypass is correctly connected and the connection is tight.
    2. The switches inside the PRO Module are set exactly as per instructions for your car model/year.​

If car is still not starting or if you have any questions or concerns please Submit a Request to our technical support team detailing the tests you have done and the results.

NOTE: when contacting our support team, please always indicate your car’s make, model and year.

Is the GM Security System (VATS, Passkey or Passlock) giving you problems?

Would you like to solve the problem permanently...

You are in the right place!

NEWROCKIES is #1 in the world. It was born to solve GM VATS System problems once and for all and it’s the only thing we do. Our PRO Module is a FULL VATS Bypass that gets rid of the system entirely, the Key part, the Lock part and the TDM (which is the brain of the system).