1996-1999 Cadillac Deville/Seville, 1996-2002 Cadillac Eldorado

1996-1999 Cadillac Deville
1996-1999 Cadillac Seville
1996-2002 Cadillac Eldorado

Locate the Instrument Cluster and install the VATS Passkey Full Bypass

1996-1999 Cadillac Deville Seville IPC Location

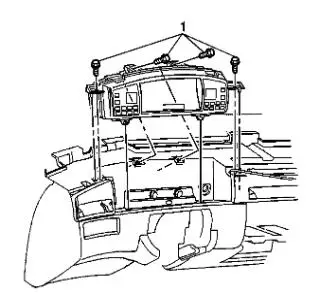
The upper dash pad will need to come off to gain access to the cluster for removal.

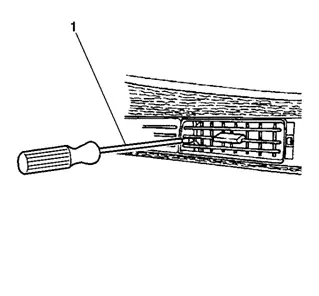
  1. Use a flat bladed tool to carefully pry the defroster grille (1) upward.
1996-1999 Cadillac Deville Seville IPC Removal Step 1
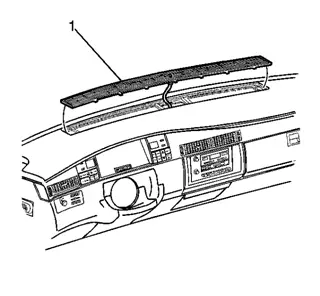
  1. Disconnect the sunload and twilight sensors from the defroster grille by turning one quarter turn.
  2. Remove the defroster grille.
1996-1999 Cadillac Deville Seville IPC Removal Step 2
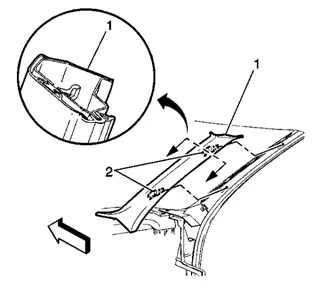
  1. Pull outward the garnish molding away from the windshield pillar in order to disengage the retainers (2).
  2. Remove the garnish molding (1).
1996-1999 Cadillac Deville Seville IPC Removal Step 3
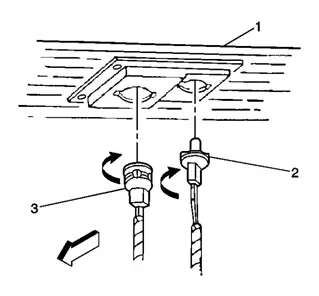
  1. Remove the 3 fasteners (1) that retain the upper trim panel.
  2. Remove the fasteners through the defroster grille openings.
1996-1999 Cadillac Deville Seville IPC Removal Step 4

Important: Do not damage the air outlet deflector surface.

Use a thin-bladed tool (1) in order to remove the 4 air outlet deflectors from the front of the instrument panel. Release the tab on the inboard side of the deflectors between the deflector and deflector housing, while pulling the air outlet deflectors out.

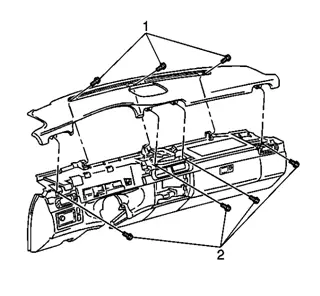
  1. Remove the 4 fasteners (2) that retain the upper trim panel.
  2. Remove the fasteners through the vent openings.
  3. Important: This step refers to the passenger side of the vehicle.
  4. Press down on the forward edge of the trim panel while pulling upward and back on the rear edge of the trim panel.
  5. Remove the upper trim panel (5)
1996-1999 Cadillac Deville Seville IPC Removal Step 5

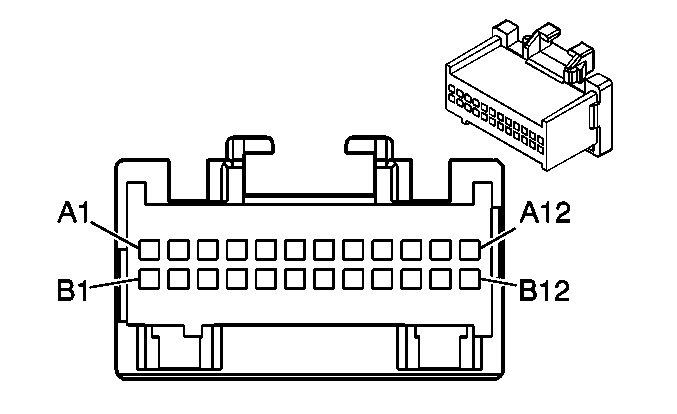
There are 3 electrical connectors on top of the instrument cluster (C1, C2 and C3). Our connections are in the C1, Blue 24 pin connector.

1996-1999 Cadillac Deville Seville IPC Connector C1 Blue

If the enclosure of your NEWROCKIES PRO Module is green and blue, please setup the switches as following (if enclosure is black, please submit a request to our support team for correct switch configurations):

Open the NEWROCKIES PRO Module’s cover (this will NOT void the warranty) by removing the 2 screws on the bottom. Inside there are 2 sets of switches.

Set the switches as in the photo here below:

Hybrid

Connect as following:

PRO Module
CAR Wires
RED
(joint to the WHT wire) Splice into the wire at the IPC Connector C1, PIN A3 (PNK)
WHT
(joint to the RED wire) Splice into the wire at the IPC Connector C1, PIN A3 (PNK)
BLK
splice into the connector C1, Pin B12 (BLK/WHT)
PPL
Not Used
GRN
Not Used
YEL
Cut the wire on Instrument Cluster C1 Pin A10 (WHT/BLK) and connect the YELLOW of the PRO bypass to the part of the wire that goes toward the IPC connector
BRN
Splice into the wire at the IPC Connector C1 Pin B10 (PPL/WHT)

If your car is still not starting...

  1. Set SW2 (10 switches) as indicated in the second row of the table below.
  2. Try to start the engine. If engine starts then replace the cover on the PRO Module, the installation is completed. Otherwise if the engine still doesn’t start, turn off the key and remove it from the tumbler, wait 4 minutes and then continue with step #3 here below.
  3. Repeat step #2 above, but with SW2 as in row 3 of the table, then if still doesn’t start repeat again with SW2 as in row 4 of the table and so on until the right code is found and the engine will start.
1992-1996 Chevrolet Corvette NEWROCKIES VATS Bypass Switches

Troubleshooting

  1. Make sure connector’s pinout and wiring colors of your car are both matching exactly those of our instructions. If not, please Submit a Request to our support team with details of the pinout and wiring colors in your car.
  2. Is the light on the side of the PRO module turning on? If not check power between RED and BLK wires of the PRO module installed and with the key in the ON position (you can use a power-meter or a light) and Submit a Request to our support team with results of the measurement.​
  3. If your instructions do NOT make use of the PPL wire of the PRO Module then skip this step, otherwise, if you use the PPL wire and points (1) and (2) above are correct and your car is not even cranking then make sure the PPL wire of the PRO bypass is connected correctly and the connection is tight. Also try shorting with a loose piece of wire the PPL and BLK of the PRO module.
  4. If car is still not cranking then Submit a Request to our technical support team detailing the tests you have done and the results.
  5. If the car is cranking, but engine doesn’t start or sometimes starts but immediately dies then do the following:
    1. If your instructions make use of the GRN wire of the PRO Module, then make sure the GRN wire of the PRO bypass is correctly connected and the connection is tight.
    2. The switches inside the PRO Module are set exactly as per instructions for your car model/year.​

If car is still not starting or if you have any questions or concerns please Submit a Request to our technical support team detailing the tests you have done and the results.

NOTE: when contacting our support team, please always indicate your car’s make, model and year.ate your car’s make, model and year.

Is the GM Security System (VATS, Passkey or Passlock) giving you problems?

Would you like to solve the problem permanently...

You are in the right place!

NEWROCKIES is #1 in the world. It was born to solve GM VATS System problems once and for all and it’s the only thing we do. Our PRO Module is a FULL VATS Bypass that gets rid of the system entirely, the Key part, the Lock part and the TDM (which is the brain of the system).